
Changing the font, changing the font family, changing the background, changing the text color, etc. are included in the style of the HTML document.
Two methods are adopted by HTML to style the document:
- Styling by HTML Style Tag
- Styling by Style Attribute
In this lesson, we will give you complete information about Style Tag and Style Attribute.
1. Introduction to HTML Style Tag
The HTML <style> tag is used to define the style information of an element.
We also call Style Element as Mini CSS of HTML Document. Because through this element you can define the inline CSS of a webpage.
1.1 Syntax of Style Tag
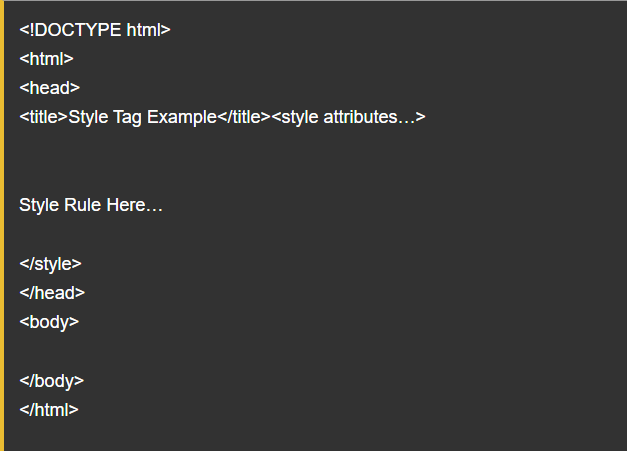
The style element is defined in the head section of the HTML document. And there, Style Rules are defined for a specific element.
Check it out:
Understand this:
From the above HTML code, we have explained the syntax of Style Tag. You are well acquainted with the rest of the Elements (!DOCTYPE, HTML, head, body, etc.). In this, we have defined Style Element and Head Element.
The style element is also defined like other HTML elements. First Opening Tag – <style> If an Attribute is to be used in this, then define it here too. Then Content (Style Rules here) and then Closing Tag – </style>. You can join a web design institute and learn the best and advanced courses to become an expert...
1.2 Commonly Used Attributes with Style Tag
With Style Tag, you can define both Global Attributes and Event Attributes. Apart from these, there are also some other important attributes, which are defined with the style tag:
- type: It defines the Attribute Media Type.
- media: This Attribute defines the Media Resource. Meaning what type of media you are defining Style Information for (All, Print, Screen, TV, etc.).
2. Introduction to Style Attribute
Like the Style Element, the Style Attribute also defines the Style Information in HTML. The style element is defined in the head section of the document, and the style attribute is used as an attribute in any element. Because it is also a Standard Attribute.
With Style Element, you can define Style Information of all Document Element at once. But, style information has to be defined separately in each element by the Style Attribute. The Style Attribute is defined in this way.
2.1 Syntax of Style Attribute
<tagname style="property: value;">
- Tagname: Here you can write any tag. For which you want to write Style Information. But, that element should be defined within the body element itself.
- Property: This is a CSS property. Meaning, which style you want to use for the element. You can also call it "What".
- Value: This is the CSS value. Meaning, what style do you want to apply for the element. You can also call it "How".
Note: CSS Property and CSS Value are pre-defined. Meaning they have already been made. You can only use them. You cannot create CSS Rule yourself.
Now we are defining some Style Rule for HTML Documents. In which the Style Attribute has been used. But, after this, we will tell you to define all the style rules together through Style Tag as well. You can learn the best HTML course near me from the advanced training institute...
3. How to Change Background of HTML Document
The Style Attribute is used in the Opening Body Tag to change the background color of the HTML document. You copy the below HTML code and paste it into your notepad or by typing this code with your hands, save the file as htmlbackground.html. And open it.

When you see the above code in the browser, you will get a result like this:

Consider the example:
In the above HTML code, we have used the Style Attribute in the Opening Body Tag to change the background of the HTML document. In which the background-color property has been used. We have set Background Color Gray here. You can write any color of your choice here.
4. How to Change Text Color of HTML Document
The Style Attribute is used in the Opening Body Tag to change the text color of an HTML document. You copy the HTML code given below and paste it into your notepad or by typing this code with your hands, save the file as htmltextcolor.html. And open it.

When you see the above code in the browser, you will get a result like this:

Consider the example:
In the above HTML code, we have used the Style Attribute in the Opening Body Tag to change the text color of the HTML document. In which the color property has been used. We have set Background Color Green here. You can write any color of your choice here.
5. How to Change Font Size in HTML Document
The Style Attribute is used in the Opening Body Tag to change the font size of an HTML document. You copy the HTML code given below and paste it into your notepad or by typing this code with your hands, save the file as htmlfontsize.html. And open it.

When you see the above code in the browser, you will get a result like this:
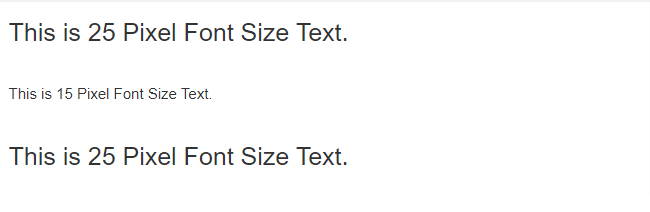
Consider the example:
In the above HTML code, we have used the Style Attribute in the Opening Body Tag to change the font size of the HTML document. In which the font-size property has been used. We have set Font Size 25px here. You can write any font size of your choice here.
If you want to become an expert in this field then you should first join the best web development institute and learn HTML CSS in Delhi
6. How to Change Font Family in HTML Document
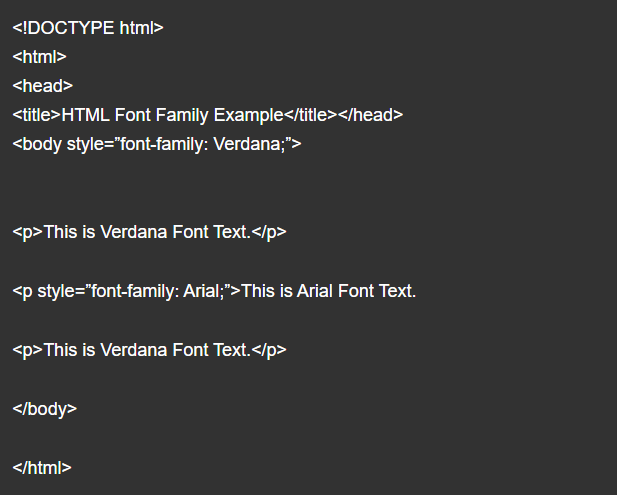
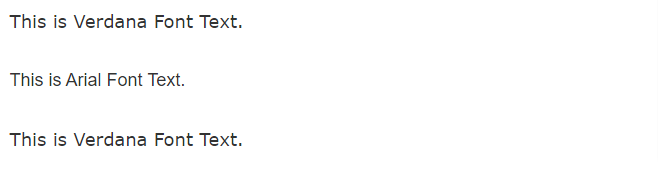
The Style Attribute is used in the Opening Body Tag to change the font family of an HTML document. You copy the HTML code given below and paste it into your notepad or by typing this code with your hands, save the file as htmlfontfamily.html. And open it.
When you see the above code in the browser, you will get a result like this:
Consider the example:
In the above HTML code, we have used the Style Attribute in the Opening Body Tag to change the font family of the HTML document. In which the font-family property has been used. We have set Font Family Verdana here. You can use any font of your choice here.
7. How to Change Text Alignment in HTML Document
The Style Attribute is used in the Opening Body Tag to change the text alignment of an HTML document. You copy the below HTML code and paste it into your notepad or by typing this code with your hands, save the file as htmltextalign.html. And open it.

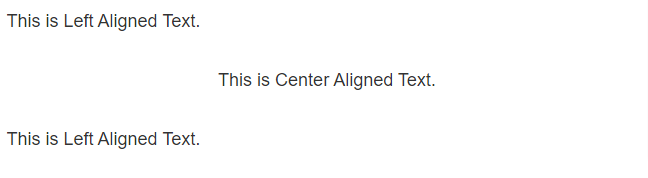
When you see the above code in the browser, you will get a result like this:
Consider the example:
In the above HTML code, we have used the Style Attribute in the Opening Body Tag to change the text alignment of the HTML document. In which the text-align property has been used. We have set Text Alignment Left here. You can set any alignment of your choice here.
Note: One more thing to keep in mind. If you want to use the same style throughout the document, then you define the Style Attribute in the Body Tag. And if you want different styles in the whole document, then define the Style Attribute in the same particular paragraph. For which you want to write Style Information.
Till now you have defined all the style rules through Style Attribute. Come, now let us define all these Style Rules by Style Tag.
Try this:
<!DOCTYPE html>
<html>
<head>
<title>HTML Style Example</title><style type=”text/css”>
body {background: gray;}
p {
color: green;
font-size: 25px;
font-family: Verdana;
text-align: center;
}
<style/>
</head>
<body>
<h1>This is Heading.</h1>
<p>This is a Paragraph.</p>
</body>
</html>
When you see the above code in the browser, you will get a result like this:

What have you learned?
In this lesson, we have given you complete information about styling the HTML document. Have you learned how to change the background of an HTML document? How to change Text Color, Font Size, Font Family, etc.? We hope that this lesson will prove useful for you.
Also Read:
- https://nextgeducation.weebly.com/blog/what-is-php-and-features-of-php
- https://nextgeducation.wixsite.com/webdesigninstitute/post/how-to-do-seo-and-how-does-it-work
- https://best-c-programming-course.blogspot.com/2021/11/what-is-programming.html
- https://nextgeducationdelhi.blogspot.com/2021/11/css-list-property.html
- https://next-g-education.blogspot.com/2021/11/how-to-add-css-code-in-html-document.html
This comment has been removed by the author.
ReplyDelete